Tuesday, November 24, 2015

Working on 'I Love My Cat' Applique Quilt


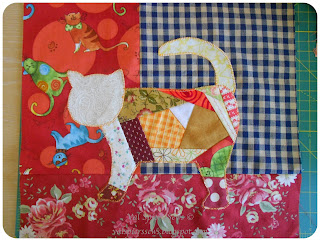
Thought I better bite the bullet and try to find some background fabrics for the cat quilt. I have been putting it off because I have lots of dark novelty prints and large patterns that are difficult to work with in a quilt. Great for tote bags though.

I have very few blenders or even light colours. I decided on a fairly dark background for this block because the lighter florals that I tried made the cat look a bit washed out.

Another thing I noticed is that I seem to have a smaller cat than the one in the magazine. I enlarged this pattern ages ago and probably had another use for it in mind. I just assumed I had the right size for the quilt. Never mind. I will make the other cats the right size. This block has some foot prints on it so it will fill up OK.

This cute quilt is by Lynette Anderson. See my first post about it.

Happy Quilting and Crafting,
Val

Friday, November 6, 2015

Joining in 'Bag It' Week 1

Decided I needed a bit of zippy therapy so I am joining in with the Bag It fun at Elm Tree Quilts. See the button on the side bar.

I am not very good at following instructions so I did fudge this one a bit except for the size.

I am trying to use up some scraps.


Happy Quilting and Crafting,
Val

Wednesday, November 4, 2015

I Love My Cat Wall Quilt


I love this quilt by Lynnette Anderson. Earlier this year I tore out all the patterns I liked from my magazines and threw the magazines away. I kept out a couple of patterns that I thought I might try this year.

The pocket was in view just under my sewing machine and I kept looking at it. Then last week I pulled down my scrap box and moved the pocket to the top of the box. Yay! I had started.


Yesterday I put together a cat body and I feel very pleased with myself.


However, today I have found a bag making challenge for November with tutorials and tips and give aways. Over at Elm Street Quilts. I already have my eye on my zipper box and will use scraps to make a little pouch to enter in the competition this week. Well, that's the plan anyway.

Happy Quilting and Crafting,
Val


Wednesday, October 21, 2015

A Little Coffee Mat

Coffee mat by valspierssews

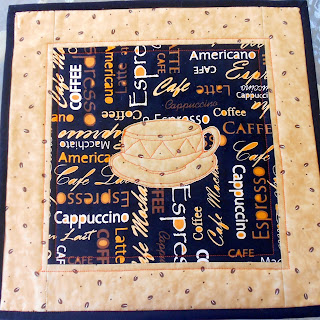
I decided to make mum a coffee mat to put on her glass table outside when she has her morning coffee out the back. It is difficult to think of Christmas presents for her so this will be it.
I go down to visit her once more before Christmas so I need to have it ready.
I have a collection of cup and saucer drawings that I traced off photos so I picked a nice shaped one. I also liked the bit of design on the cup.

I cut a 10 1/2" square then cut 2 1/2" strips 2 x 10 1/2" and 2 x 14 1/2". You must measure and cut them to make the mat square.
I like to press my seams open.

Coffee mat by valspierssews

I made a one piece applique of the cup and saucer then drew in the details with my air erasable pen. It was easy to free motion over the design.

Coffee mat by valspierssews


Coffee mat by valspierssews


Coffee mat by valspierssews

I glued the wadding and the backing on with 505 basting spray.

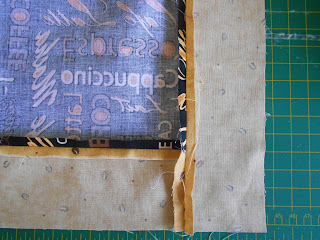
I used a 2 1/4" wide strip to make the double fold binding and folded it using my electric bias machine.

I stitch the binding onto the wrong side stopping 1/4" before the corner, do a back stitch, then with my needle down turning to direct the stitching out to the corner. That is the only different step all the rest is the same. I find this little angled stitching makes mitring the corners so easy.

Coffee mat by valspierssews

Here it is all done. I love it. It was quick and easy so it doesn't have to be treated like a treasure. I know mum will like it.

Coffee mat by valspierssews

Happy Quilting and Crafting,
Val

Wednesday, October 14, 2015

Playing with Washi Tape

valspierssews
The book Washi Wonderful by Jenny Doh and my washi tape set.
I borrowed a lovely craft book from my library, all about using washi tape. There are some great gift wrap and card ideas but I was taken by the covered light switch.

I used my Kikki K washi tape set.

valspierssews
The finished light switch.
I can just see it from my desk and it looks so pretty. I really need to put washi tape on a lot more things :)

Happy Quilting and Crafting,
Val

Thursday, June 11, 2015

KNK Zing Air

I have been far too slow to get on the Klik n Kut and work out how to use it. Today I took the final plunge and used the cutting blade. I had several goes with the pen only, to work out how to place my fabric and set up the machine to cut in the right place.

I already had my SVG file ready to import into Make the Cut software. I deleted most of the shapes and kept the heart and two circles for testing.
Using 100% cotton quilting fabric backed with fusible applique paper I did a test cut on the minimum settings recommended. The fabric didn't quite cut through.

The only two things I could adjust were the amount of blade sticking through the holder and the force.
I adjusted the blade so it easily cut through two sheets of paper and I adjusted the force up to the higher recommended level.
I was thrilled that it worked perfectly. The fabric was cut through nicely and the paper backing was only just cut. My fabric pieces peeled off the paper backing very neatly.
The fusible paper backing is perfect to use with this machine because it sticks very well to the cutting mat.
As you can see, my mat isn't very clean. DH has been doing lots of testing and playing with light card. The paper backing stuck well though.


Here you can see where my first go didn't cut right through. On the new settings the fabric lifted out easily.


My KNK Zing Air settings were:
Yellow Fabric Blade - easily cuts through 2 sheets of paper. It just peeps out of the casing.
Speed - 9
Force - 135
Cuts - 2

I used a 12" virtual mat on portrait.
I chose the WYSIWYG setting for cutting.
I set the origin at the bottom right hand corner of the mat.

What is the point of all this?
I need to cut out 14 sets of applique pieces for 14 blocks of my Go Wild Quilt. This machine will make it very quick and easy.

My next experiment will be fabric on its own. I have read that the fabric tends to be dragged by the blade rather than sticking firmly. We shall see.

Happy Quilting ans Crafting,
Val


Sunday, April 19, 2015

Scrapbooking


I have some physical scrapbooks from the late 80's early 90's when the daughters were little and we moved around a bit. I thought it would be nice to have a journal with photos and various clippings as a memory jogger for the different places we lived.

Those were the days when you had to wait 3 days to get your photos back and my scrapbook was a school project book from Big W where I glued everything in with a regular glue stick.
I don't do much with my photos anymore but I do write a journal of sorts in a physical diary.

I like to blog and I have seen that a bit of embellishment with photos on people's blogs looks really nice. Where do I get pretty backgrounds and elements to use on my blog? There are not many out there that can be used on a blog or webpage without a large fee and some just don't allow it at all.

If you are looking for some nice embellishments and can't make your own I can recommend a look at Pixel Scrapper.


For personal use and at no cost you can register and download several elements or papers a day. There are lots to choose from and free is good. There is also a free mini kit each week that you can sign up for for free. Well worth it. The founders of the site just want to share their joy of scrapbooking so they make it easy to get their images and files.

I was looking for something I could use commercially with my doll clothes patterns. For $20 USD a month I can download 5 kits a day and use them pretty much for any commercial project. If you pay for the year up front you can download as much as you like. I decided to go month to month to see what I needed. I can stop at any time and keep the kits for commercial use for ever.

For $10 USD a month you get personal use downloads.

The site is also a nice community of scrapbookers who share their layouts in the gallery as well as lots of free elements and templates.

The only thing I have done so far is this collage. I made it to promote the free fashion file that goes with the the purchased pattern. My favourite part of my pattern business is designing and sewing. The promotion part just has to fit in somewhere when I feel like playing on the computer. It sucks up a lot of time. But as with my sewing and designing, only practice and playing with it will lead to improvement.


I don't have any affiliation with Pixel Scrapper. I just like them and their product.

Happy Quilting and Crafting,
Val

Tuesday, April 14, 2015

Treasured Blogs


Mel at The House on the Side of the Hill is always thinking up things to blog about. I like the idea of her Treasured Blogs linky. Since the only sewing I am doing lately is doll clothes that I blog about on my Doll Designs blog I needed a nice post for my general sewing blog.

I found a fun blog in my wanderings looking for doll clothes ideas. Larri is a lovely lady with lots of great ideas for craft and sewing and cooking and some doll clothes as well. She even has lots of book reviews. I am sure you will enjoy browsing around her blog and maybe even leaving a comment.
Her blog is called Seams Inspired. I love the twirling photo on her header. It reminds me of the book store in You've Got Mail.

Screen shot from Seams Inspired

Happy Quilting and Crafting,
Val


Tuesday, March 31, 2015

A tiny bit of patchwork

Anything I make lately has to do with doll clothes but I have managed to add a touch of patchwork and quilting to my latest design.


Happy Quilting and Crafting,
Val

Saturday, March 28, 2015

New Doll Clothes Pattern

Check out my new 18" doll clothes pattern for shorts and trousers on my Doll Designs blog.


Happy Quilting and Crafting,
Val

Monday, February 23, 2015

Time to Clean the Machine

I try to get my machine serviced every 1 to 2 years. It costs about $100 but it is worth it.

In between times I clean out the fluff build up. I have just finished quilting a block from my Wild garden quilt. I always put the wadding on each block separately for quilts. I then sew the blocks together and put the backing fabric on. Anyway, the wadding creates quite a bit of fluff.


The screws for the needle plate are small and losable so I put them on a magnetic strip.


The bobbin housing lifts out easily for my Bernette machine. Best thing I ever did was get a machine with the drop in bobbin.

Use the little brush to lift out as much fluff as possible. I give a few puffs to get the little bits out. Don't forget to get between the feed dogs. I should have taken the foot off but worked around it today.

My needle is still going fine so I won't change it just yet.

I was inspired to clean my machine today by finding this blog post on the Sewing Loft:

Clean Your Sewing Machine.

Actually I found it through Rosie's Doll Clothes Patterns on Facebook. (I recently bought some really cute shoes for my doll through Rosie. She is based in Australia.)

Happy Quilting and Crafting,
Val

Saturday, February 21, 2015

Working on my latest doll clothes pattern


It is just so nice when things work out. This pattern is so easy to customise. I have looked up some steam punk outfits and have fabric all picked out and ideas almost gelled to go from cutesy to a modern edge with the same pattern.

Post by Val Spiers Sews Doll Designs.

Happy Quilting and Crafting,
Val

Tuesday, January 27, 2015

Cooking for Two - Meatballs and Cherry Relish

This meal was my first foray into the kitchen for quite some time. I cook the odd cake or pikelets but this was a lot of fun.


I got out my herb chopper.


I got out my mortar and pestle.


I refused to get my hands all sticky mixing the meat. It was bad enough rolling the meatballs.


There was just enough for two but DH doesn't like all the spicy bits so I got to put the other half away for the next day.


This recipe was highly adapted from a Kylie Kwong recipe. I didn't have fresh dates or preserved lemons or sour cherries so I used what I had to hand. It was delicious.

Meatballs and Cherry Relish

Ingredients

250g minced beef
100g minced pork
1/2 medium red capsicum chopped
1 small red onion chopped
2 tbs olive oil
1 tbs chopped fresh ginger
1 tsp sea salt
1 egg
2 tsp grated lemon rind
3 tbs chopped mint
3 tbs chopped parsley
1 tbs honey
1 tsp ground cumin
1/2 tsp ground cinnamon
1/4 cup extra olive oil

Heat the oil in a frying pan and cook the capsicum and onion until soft.
Grind the ginger and sea salt together with a mortar and pestle.
Mix all the ingredients with the mince.
Shape into about 12 small meatballs and roll in some plain flour.
Use the extra oil to shallow fry the meatballs 6 at a time.

Meanwhile make the cherry relish.

Ingredients

2 tbs frozen blueberries, thawed
2 tbs craisins
Spring onion finely sliced
2 tbs olive oil
1 tsp sea salt
1/3 cup chopped fresh cherries
2 dates chopped
2 tsp vinegar

Soak the craisins and dates in 1/3 cup of boiling water for 20 mins.
Heat the oil in a saucepan and stir the onion and salt for 2 mins.
Add cherries and stir for another 2 mins
Stir in the blueberries and the soaked fruit and water.
Simmer for 5 mns until slightly reduced.
Stir in the vinegar.

Place the meatballs in a shallow dish. Add the relish and a dollop of plain yoghurt.

Download the PDF

Happy Quilting and Crafting,
Val

Friday, January 23, 2015

Sewing Successes

Sewing dolls clothes is so addictive. I have finished all the skivvy samples and now find myself immersed in underwear. Did you know there are hardly any underwear patterns for 18" dolls. Even the finished article is pretty scarce.
I bought a few metres of batiste fabric. It is lovely to work with. Light and breezy but firm enough to sew easily.

The petticoat and undies.


These I called shortie pyjamas even though the top is just my first attempt at the petticoat. It came out really short!


Here is my latest skivvy.
 

I am now working on a combination one piece undergarent that has some pin tucks and lace in the front. They take up so much lace for the neck and armholes and pants legs but it looks really nice.

Lots of tropical rain here today so it has been a good day to sit and sew. I get so excited about the doll clothes designs that even though my Go Wild quilt is sitting out on the table I keep passing over it to draw new designs and cut out new samples for the doll. Next week I will work on the quilt.

Happy Quilting and Crafting,
Val

Wednesday, January 14, 2015

Living in the Moment

One of my new year resolutions is to spend some time each day enjoying the 'now'. A couple of things I try to do each day is forget everything and savour the first couple of mouthfuls of a meal or become aware of sensations on my skin as I sit and dream for a little while.

I am also trying not to get nostalgic about the past. Sure, everything is fast paced and 24/7 now, but no mobile phone, no internet, no spin dry, no air conditioning! I like the present times.

To celebrate the things I like I have drawn up some kitchen art. I have started stitching it but realised that I needed better glasses to see where I am going.


The small writing is a bit small for stitching so I need to modify it a bit yet for general consumption as a stitchery but it could be just art for now.

Happy Quilting and Crafting,
Val

Friday, January 9, 2015

Some UFO Finds and Finishes. Fabric Box Tutorial

As I continue to look through all my sewing boxes I have discovered some projects from quite a while back.
I had some pot holders and a double glove and two single gloves made with puppy fabric and I used wool fabric as the heat resistant insides. When they got too grubby and were a few years old I picked them apart to get the wool fabric out and started making them over with owl fabric. I finished the pot holders and one glove and nearly finished the double glove. I found the double glove again with the long piece in owl fabric and the two single pieces still with puppy fabric. I decided that out of the box and into the kitchen again was better than thinking about changing out the puppy fabric. It was a done deal when I found a good length of bias strip all ready to go in my little box of binding left overs.


Then I found a cute little scissor holder that I made several years ago. You can get the free pattern from my blog post of Jan 2012.
I used sticky velcro dots to velcro it to my sewing machine. I had to sew the dot on the fabric. Now I can look at it all the time.


Next was two sets of 10" squares ready to make into little boxes. The original boxes turned out very little but I decided to make these two a bit bigger so they would be more useful. I now have a pretty thread catcher and a reel saver (I tend to knock them off or they roll off). I like to have my most used cottons just next to me.


Start with two 10" squares and put interfacing on the back of each.


With right sides together stitch all around except for a gap on one side for turning. Press the seam allowance down along the gap. Trim the corners.


Turn and press.


Fold up and pin the gap side and the other side.


Stitch close to the edge.


Bag the corners. Measure down the seam lines from the corners 2 1/2" and put in a pin. I then ruled a line in pencil.


Stitch straight across the corners level with the pin.


Stitch along the edges at each corner.


Stitch along the bottom edges and this holds the bagged corner pieces flat.


I am thinking a strip of rick rack braid sewn around the top edge will look nice as well as make the top edge a bit firmer. I will do that when I find my rick rack braid. I found the ribbons but now I can't remember where the rick rack is. I am starting up a big box for ribbons and braids and laces. Soon they will all be in one place. Yay!

When I was looking for the carrot scissor holder pattern I realised that I have quite a few free patterns from over the years. Have a look through. Here is the link to all my posts with the label 'free pattern'.

Happy Quilting and Crafting,
Val


Related Posts Plugin for WordPress, Blogger...